My Blinkie

Forum Hangout

This tutorial was written by Ashley Zimmerman on 8/11/20
Maryline Cazenave 113-2 which you can get HERE
The bundle does include the kit and 3 tubes 113-1 ,113-2, 113-3
Masks Used : AKK_Mask03 & AKK_Mask61
DSB Flux Bright Noise
DS- Drop Shadow
RS- Resize
to resize in PSP go to IMAGE - RESIZE
SN- Sharpen
PAS - Place as shown
Apply Drop Shadow to all your elements as we go along unless I state NO DS!
Or state a change in the settings of the DS
*Also Sharpen all your elements as we go along!
**If you ever get confused as where to place an element just look at my tag for reference!**
Open a new canvas 800 x 800
Open tube 113-2 (or tube of choice) C&P as new layer
RS 70%, align center in canvas - SN & add DS
but change your settings for your DS to
V:6, H: 0, Opacity: 80, Blur : 15
Now onto the elements
NOTE now we will be going back to our original
DS settings - 5, 0, 50 , 15
left of the mug
Open element 3 - RS by 20% place beneath element 2 , PAS
SN & ADD DS
Open element 1 - RS by 25% , PAS
SN & ADD DS
Open element 41 - RS by 55% place beneath the tube to the left
SN & ADD DS
Open element 53 -
Image - Flip Horizontal / RS by 35% place above element 41
SN & ADD DS
Open element 35 - RS by 45% PAS
SN & ADD DS
Open element 12 - RS by 20 % place above element 1
SN & ADD DS
Open element 11 - RS by 40% place above the tube layer to the left
SN & ADD DS
Open element 19 - RS by 15% place above element 11
SN & ADD DS
Open element 6 - RS 20% place above tube layer to the right
SN & ADD DS
Open element 5 - RS 20% place beneath element 6
SN & ADD DS
Duplicate element 1 , rename element 1-2
Place above tube layer to the left
Duplicate element 1-2 / Image - Mirror Horizontal
Open element 16 - RS by 35% place beneath tube layer to the right
SN & ADD DS
Open element 14 - RS by 35% place above element 35 to the right
SN & ADD DS
Open element 37 , Image - Free Rotate - Left : Free : 25 degrees
place beneath element 35 to the left
RS by 45% SN & ADD DS
Open element 47, Image - Free Rotate - Left : Free: 25 Degrees
RS by 40%
place above element 37 to the left - SN & ADD DS
Open element 65 - RS by 45% place above element 47 to the left
SN & ADD DS
Open element 27 , Image - Flip Horizontal , RS by 25%
place above element 65 to the left
Open element 21 - RS by 15% place above tube layer as shown
SN & ADD DS
Open element 13 - RS by 10% place above element 6
duplicate element 13 , move under original and move it slightly to the right as shown
Merge both elements (13 and its duplicate) together
SN & ADD DS
Open element 68a - RS by 20% place above element 35 to the right
SN & ADD DS
Duplicate element 68a , Image - Mirror - Horizontal
move above element 37 place as shown - rename leaves
Open element 62 - RS 40% place above leaves to the left
SN & ADD DS
Open element 62 again - RS 60% place beneath element 37 to the right
SN & ADD DS
Open Spray 6 - RS by 40% place above element37
Open Spray 2 - RS by 30 % place above element 68a
SN & ADD DS
Open Spray 5 place above Spray 2 as shown
(erase the part of the spray that is peeking out underneath the tag)
Open Paper 12 RS 800 x 800 PIXELS
C&P on canvas
Make this your bottom layer
Layers - Load Mask From Disk- AKK_Mask03
Merge this group together
Open Paper 9 RS 800 x 800 PIXELS
C&P on canvas
Move this under your first mask layer
Layers - Load Mask From Disk - AKK_Mask61
Merge this group together and RS by 95%
Crop away any excess canvas
add copyright and names
and we are done !
For my name I used the font Will and Grace
Size 72 , Color #47351d
Type out your name
Convert to raster layer
Effects - Plugins - DSB Flux - Bright Noise
Intensity 45 - Direction : Mix - Select OK
Sharpen!
Now Effects - Plugins - Eye Candy 4000 Gradient Glow
with these settings ::
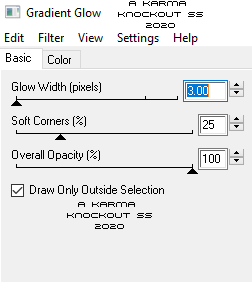

Select OK
Now go back again to your eye candy 4000 gradient glow and now
use these settings :

ADD DS BUT change your OPACITY to 90
And that's all folks!
I hope you enjoyed my tutorial !!
Here is my Halloween Gradient Set
They are in PSP and PS format!
They are FTU and PERSONAL USE ONLY!
**NO SHARING**
If someone would like to use them please
redirect them to my blog so they can download them!!
You can download them HERE
Preview::

redirect them to my blog so they can download them!!
You can download them HERE
Preview::

Here is my Autumn Gradient Set
They are in PSP and PS format!
They are FTU and PERSONAL USE ONLY!
**NO SHARING**
If someone would like to use them please
redirect them to my blog so they can download them!!
You can download them HERE
Preview::

First time ever doing this but I had some
gradients from making templates and some
for some random challenges!
So I made this misc set !
They are in PSP and PS format!
They are FTU and PERSONAL USE ONLY!
**NO SHARING!**
If someone would like to use them please
redirect them to my blog so they can download them!!
You can download them HERE
Preview ::
