This tutorial was written by Ashley Zimmerman on 8/6/2024Any resemblance to any other tutorial is coincidental.Supplies I Used:PSP – I used 2020 but any version will doTube of Choice- Enamorte 84-2Font of Choice - I used The maria storyI used a mask by me - Summermask-01-KK24 HEREand also used a 2nd mask - Suz cmbbmask12Plugins Used: Eye Candy 4000 Glass, Xero-Bad DreamI Used Stus kit Entry To Evil HEREI Used 2 FTU Animations from Simone:
SimoneAni-LightningSpecial-02 and SimoneAni-LadyVampire-07Just click the names of the animations and it will take you to them!
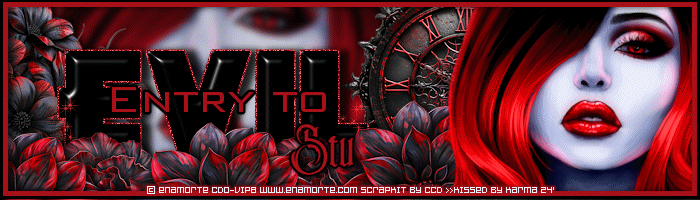
Here is my Wordart you can use
(the steps are still below if you want to type out something else!)
**Abbreviations I use**DS- Drop ShadowLP-Layer PaletteRS-Resize
DONT FORGET TO SHARPEN and ADD DROP SHADOW to EVERY ELEMENT!
Drop Shadow used in this Tutorial is:V:0, H:5, opacity:80, Blur:10
Lets make a quick animated sig!
open a new canvas 700x200Selections-Select AllSelections-Modify-Contract by 3Selections-InvertFlood fill with color of choiceSelections-Select none
Do the selections steps above again BUT this time contract by 8and flood fill with color of choice add ds (V:0, H:5, opacity:80, Blur:10)
Drag paper 20 onto your LP & RS 70%C&P your tube layer place this above your paper layer all the way to the rightPlugins-Xero-Bad Dream
select your text tool and type out EVIL in a BOLD fontI used Pink Rocket the size is 150 Convert your text layer to a raster layer-rename text layermove below your tube layerand place where you would likeWith your text Layer still activeSelections-Select AllSelections-FloatSelections-Modify-Expand by 2in your LP add a new raster layer and move this beneath your text layerand flood fill with color of your choiceAdjust- Add/Remove Noise-Add Noise-Uniform, Noise:60, monochrome checkedsharpen - Selections- Select None-rename glitter layer
Activate your text layerSelections-Select AllSelections-FloatSelections-Defloatin your LP add a new raster layer (Keep this above your text layer!)Effects-Plugins-Eye Candy 4000-Glass with these settings
selections-select nonerename this glass layer
select your text tool again and type out Entry To - font I used was Bank Gothicconvert to raster layer(you want this layer above your glass layer)Effects-Plugins-Eye Candy 4000- Gradient Glow with these settings
I use Medium in the SS
Activate your glitter layer and add DS of choiceI used V:0, H:10, Opacity:85, Blur:10
Drag element 91 onto your LP & RS 20% place below your tube layer as shown in tagsharpen and DS (do this to every element!)Drag element 96 onto your LP & RS 15% place below element 91 as shown in tagDrag element 53 onto your LP & RS 25% place above your paper layer as shown in tagDuplicate element 91 , rename El 91 left and place above element 96 to the left Duplicate element 96, rename El 96 left and move to the left as shown in tagDuplicate El 91 left and move to the very left side of your canvas as shown in tagDrag element 78 onto your LP & RS 30% place above your paper layer all the way to the left of your canvas
C&P your tube layer and place above your paper layer as shown in tagAdjust-Blur-Gaussian Blur-3
If you aren't animating then you are done here add your copyright and name(s)
Animation-
Open Jasc Animation Shop and open your animationsI am using SimoneAni-LightningSpecial-02 and SimoneAni-LadyVampire-07
In PSP Layers-View NoneActivate your Paper Layer and Tube Layer
Now activate only your paper layer where the finger is pointing in SSEdit-Copy Special-Copy Merged
Back to AS Edit-Paste as new animationCTRL+L and make sure you have 15 frames same as our animationEdit- Select AllEdit-Propagate Paste
Activate your animation
SimoneAni-LightningSpecial-02we are going to resize this animation settings below:
Edit-Select AllEdit-Copy
Activate your sig Edit-Paste into selected frame and place where you would like
Back to PSP
Layers-View NoneActivate all your layers above our tube and paper layer we usedDO NOT make your paper layer and tube layer active again!CTRL and click on each layer in your LP and make visibleactivate your bottom layer which should be Element 78
Edit-Copy Special-Copy Merged Back to AS
On your sig tagEdit-Paste into selected frame
Activate animation Lady VampireDelete frame 16(we need 15 frames like our other animation!)Edit-Select AllEdit Copy
Activate your sigEdit-Paste into selected frame place this above your letter L in EVILgo back to your animation Lady Vampire and select Animation - Mirror
Edit-Copy
Activate your sigEdit-Paste into selected frame above your E in Eviland we are done!
Hope you enjoyed
xx


0 comments:
Post a Comment