Supplies I Used:PSP – I used 2020 but any version will doFont of Choice - I used Lounge BaitI am using Stus kit Colors Of The Ocean HEREI am using 2 FTU Anis from Simone
SimoneAni-WaterRipples-001 HERE
and SimoneAni-366 HERE
**Abbreviations I use**DS- Drop ShadowLP-Layer PaletteRS-Resize
DONT FORGET TO SHARPEN and ADD DROP SHADOW to EVERY ELEMENT!
Drop Shadow used in this Tutorial is:V-0, H-3, Opacity:50, Blur:10
Open a new canvas 700x200Selections-Select AllSelections-Modify-Contract 3-Selections-InvertFlood Fill with color of choice - Pick 2 colors from your tube or kitI used HTML- #2c477fDo this again but contract to 5 and flood fill with color of choice - I used HTML- #d1c1b2
Add DS V-0, H-3, Opacity:50, Blur:10
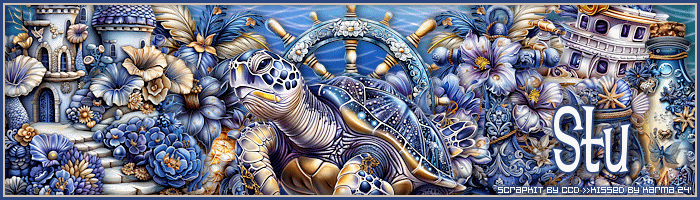
Drag Paper 18 onto your canvasDrag element 22 onto your canvas & RS 25% place all the way to the leftDrag element 12 onto your canvas & RS 15% place below element 22 slightly to the rightDrag element 9 onto your canvas & RS 25% place above element 12 slightly to the right Drag element 8 onto your canvas & RS 20% place below element 9 to the rightDrag element 11 onto your canvas & RS 20% place below element 12 keep where it isDrag element 17 onto your canvas & RS 25% place below element 11 to the leftDrag element 14 onto your canvas & RS 13% place below element 8 to the right Drag element 20 onto your canvas & RS 20% place below element 17 all the way to the rightDrag element 21 onto your canvas & RS 20% place below element 20 slightly to the leftDrag element 18 onto your canvas & RS 20% place below element 21 to the left (fill in that gap)Duplicate element 17 - Mirror-Horizontal and move below element 18Drag paper 20 onto your canvas place above paper 18 - Blend Mode Overlay-Merge downadd copyright and name(s)
Animating-
Open Jasc Animation Shop and open your animationsI am using SimoneAni-WaterRipples-001 and SimoneAni-366
In PSP activate your paper layer - Layers- View current only Edit-Copy Special-Copy Mergedgo into Jasc AS and Edit-Paste as new animation press CTRL+L until you have 14 frames Edit-Select AllActivate SimoneAni-WaterRipples-001 Edit-Select AllEdit-CopyEdit-Propagate Paste (MAKE SURE PROPAGATE PASTE IS CLICKED!!)Now go to your Sig tag and Edit-Paste into selected frameView Animation and see if you like the placement
If not just undo it and redo :)
Back to PSP
In your LP hide your paper layermake visible Elements 17, 18, 21, 20, 17, 11 and 12your canvas should look like this below
When you have them all shown activate element 17 this should be your bottom layer!
(shown in SS below)
Edit-Copy Special- Copy Merged
Back to Jasc AS
Edit-Paste into selected frame on your sig tag and place where it goesActivate SimoneAni366Scroll all the way to the right to Frame 15 and Delete this frame(We need 14 frames like our water ripples)Now click Animation-Resize Animation- SS below
Edit-CopyActivate your Sig Tag Edit-Paste into selected frame and place where you would like
Back to PSP
Now we want to hide all the layers that we had visible (they were elements 17, 18, 21, 20, 17, 11 and 12)Press CTRL & click on Element 12 and keep doing that for all the layers above itthen click the eye to make them all visible your canvas should look like this
Now activate your bottom layer which should be element 12
shown in SS belowEdit-Copy Special-Copy Merged
Back to Jasc ASEdit-Paste into selected frame on your sig tag-place where it goesand we are done!!!
I do not script animated tagsI save it as a .mngThen I go back to PSPI type all my names on my tag (I add glow, ds etc.)I activate the first name layer - Layers - View Current OnlyEdit-Copy Special-Copy Merged Then in Jasc I open my .mng file for however many names I haveI do CTRL+A in each one so I know all the frames are selected before I start bringing the names overthen I Edit-Paste into selected frame then I save it as .gifand then onto the next one and so on!
Hope you enjoyed!!
xx


0 comments:
Post a Comment